Custom "details" form
Structure of details form
Header of details form - text defined by next templates
    scheduler.templates.event_header
    scheduler.templates.event_bar_text
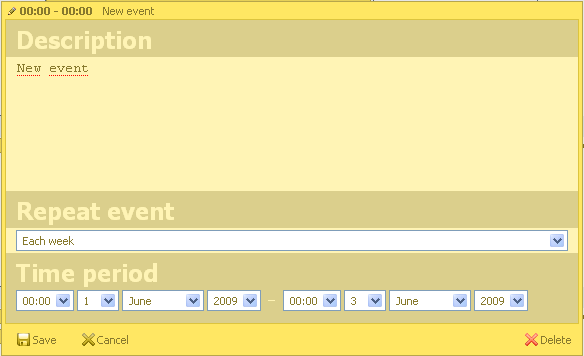
Sections below defined through scheduler.config.lightbox.sections, default configuration is the next
	lightbox:{
		sections:[	{name:"description", height:200, map_to:"text", type:"textarea" , focus:true},
				{name:"time", height:72, type:"time", map_to:"auto"}	]
	}
Sections is an array, which represent the sections inside the form
- name - name of the section , based on section name its label will be taken from locale collection. For example, for “time” section , label will be taken as scheduler.locale.section_time
- height - height of section
- map_to - property maped to the editor
- type - type of editor
- focus - if set to true, related field will receive focus on form showing
Types of editors
- textarea - represented by textarea
- time - start and end date selectors
- select - selectbox
	{name:"reccuring", height:21, type:"select", map_to:"rec_type", options:[
		{key:"", label:"Do not repeat"},
		{key:"day", label:"Each day"},
		{key:"week", label:"Each week"},
		{key:"month", label:"Each month"}
	]},
Select editor, can define collection of options
Mapping DB fields to the form
On server side, just add some field to the list of data fields
$scheduler->render_table("events_rec","event_id","start_date,end_date,text,rec_type");
If you are generating xml by custom code, just add subtag to the event as
   <event id='50' >
	<start_date><![CDATA[2009-06-10 00:00:00]]></start_date>
	<end_date><![CDATA[2009-06-12  00:00:00]]></end_date>
	<text><![CDATA[New event]]></text>
	<rec_type><![CDATA[ some value ]]></rec_type>
   </event>
Now on client side, you can use the same name in the map_to attribute of event
{name:"reccuring", map_to:"rec_type" ...
Custom editors
Final code can be checked at samples/sample_custom_editor.html
To create your own custom section, you need to define new object in the next way
	scheduler.form_blocks["my_editor"]={
		render:function(sns){ //sns - section configuration object
			return "html code of editor here";
		},
		set_value:function(node,value,ev){
			//node - html object related to html defined above
			//value - value defined by map_to property
			//ev - event object
			... code to set value to the element ...
		},
		get_value:function(node,ev){
			//node - html object related to html defined above
			//event object
			return "current value from editor";
		},
		focus:function(node){
			//node - html object related to html defined above
			...code to set focus to the element...
		}
	}
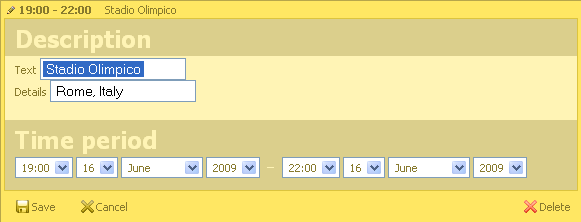
In real life it may look as
scheduler.form_blocks["my_editor"]={ render:function(sns){ return "<div class='dhx_cal_ltext' style='height:60px;'>Text <input type='text'><br/>Details <input type='text'></div>"; }, set_value:function(node,value,ev){ node.childNodes[1].value=value||""; node.childNodes[4].value=ev.details||""; }, get_value:function(node,ev){ ev.location = node.childNodes[4].value; return node.childNodes[1].value; }, focus:function(node){ var a=node.childNodes[1]; a.select(); a.focus(); } } scheduler.config.lightbox.sections=[ { name:"description", height:200, map_to:"text", type:"my_editor" , focus:true}, { name:"time", height:72, type:"time", map_to:"auto"} ]
Making section readonly
Can be done by customizing set_value method of related section object
    scheduler.form_blocks.textarea.set_value=function(node,value,ev){
        node.firstChild.value=value||"";
        node.firstChild.disabled = ev.disabled; // or just = true; to disable for all events
    }
Can be done by customizing set_value method of related section object
    scheduler.form_blocks.textarea.set_value=function(node,value,ev){
        node.firstChild.value=value||"";
        var style = ev.some_property?"":"none";
        node.style.display=style; // editor area
        node.previousSibling.style.display=style; //section header
        scheduler.setLightboxSize(); //correct size of lightbox

    }
Replacing with custom form
Just redefine showLightbox method with any custom one
    scheduler.showLightbox = function(id){
         // id - id of event
         ... code to show any custom form ...
    }
Button in section header
It possible to have a custom button in section header, to create it just add a button property to section object
{name:"description", height:130, map_to:"text", type:"textarea" , focus:true, button:"help"}
    scheduler.locale.labels.button_help="Help label";
    scheduler.form_blocks.textarea.button_click=function(index, src, sec, data){
             //called on button click
             // index - index of section
             // sec - html element of section header
             // sec - html element of section editor
    }
You can define image used for the button through next css class
  .dhx_custom_button_help{
       background-image:url(imgs/but_help.gif);
  }
Recurring events
In case of recurring events, form configuration looks like
[
	{name:"description", height:130, map_to:"text", type:"textarea" , focus:true},
	{name:"recurring", height:115, type:"recurring", map_to:"rec_type", button:"recurring"},
	{name:"time", height:72, type:"time", map_to:"auto"}
]
You may add any extra section, but need to preserve both recurring and time sections. It is important that time section is placed after recurring section.